
Installation Instructions
UAV Toolbox comes as an Android App install file (.APK) that you can download to your PC or laptop to install via an SD card.
- Copy the APK file to an SD card, insert into ST16
- On the ST16 click 'PAD' to view the green Android Home screen.
- Click the Apps Icon (
 ) to see Apps installed on the ST16
- Open the File Manager (
 )
)
- Select the 'Category' tab (top left). It may take a moment to scan your SD card
- Click the 'Apks' Icon (
 ) to select and install the App (you may need to Allow Unknown Sources to proceed)
- You can Open the app immediately, or click 'UAV Toolbox' (
 ) on the Apps screen to open it at any time
- Tap the red 'Offline' message to connect to your home network if necessary (click back once connected)
- Register to start your free evaluation, or login with your email and password
- If successful, the main UAV Toolbox screen will display an 'Online' message
Downloading Data
UAV Toolbox makes it easy to download telemetry from your ST-16 to your PC. You can also download FPV video and photos from Typhoon H flights.
In the main menu, check that the text on the bottom left reads 'Online' in green:

If the controller is not online, tap on the red 'Offline' text to select and connect to a WiFi access point.
Next to the Online message is a URL (in the picture above, http://192.168.0.27:8080). Type this URL into your PC browser window. So long as it's on the same network as the ST-16, it should connect and show a web page like this:
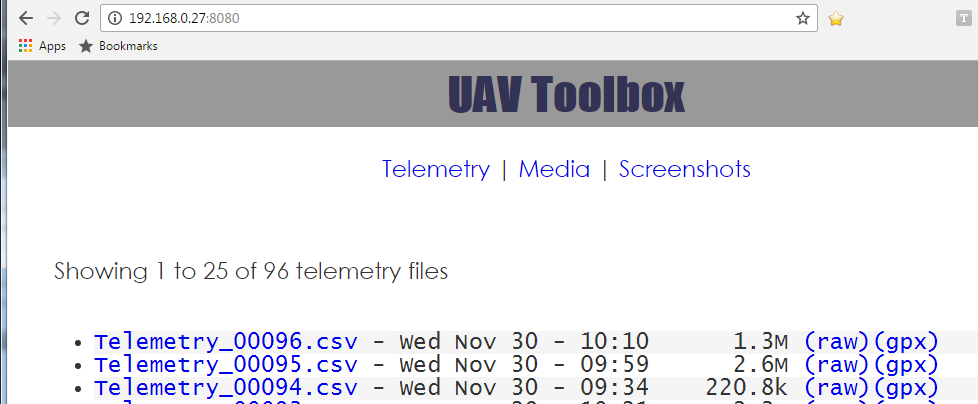
You can now browse all of the telemetry files stored on your ST-16. Click on a file to download it. Note that telemetry files are automatically converted to work with third party tools such as Dashware. This conversion removes invalid entries, corrects for time adjustment and alters the time format. If you want the original, unmodified telemetry file, click on the (raw) link. If you want the telemetry file in GPX format, for use with Google Maps and other tools, click on the (gpx) link.
To view and download video and photos from the ST-16, click the 'Media' link at the top of the page. This will show all media stored on the ST-16. These are automatically recorded from the FPV view during flight. Video is at 720p. Click on the file name to view the media in your browser, or the (↓) download link to download it to your PC.
Whilst playing back telemetry in UAV Toolbox you can take screenshots by tapping the camera icon at the top of the screen. Screenshots can be viewed and downloaded by clicking the 'Screenshot' link at the top of the browser page.
Mission Editor Guide
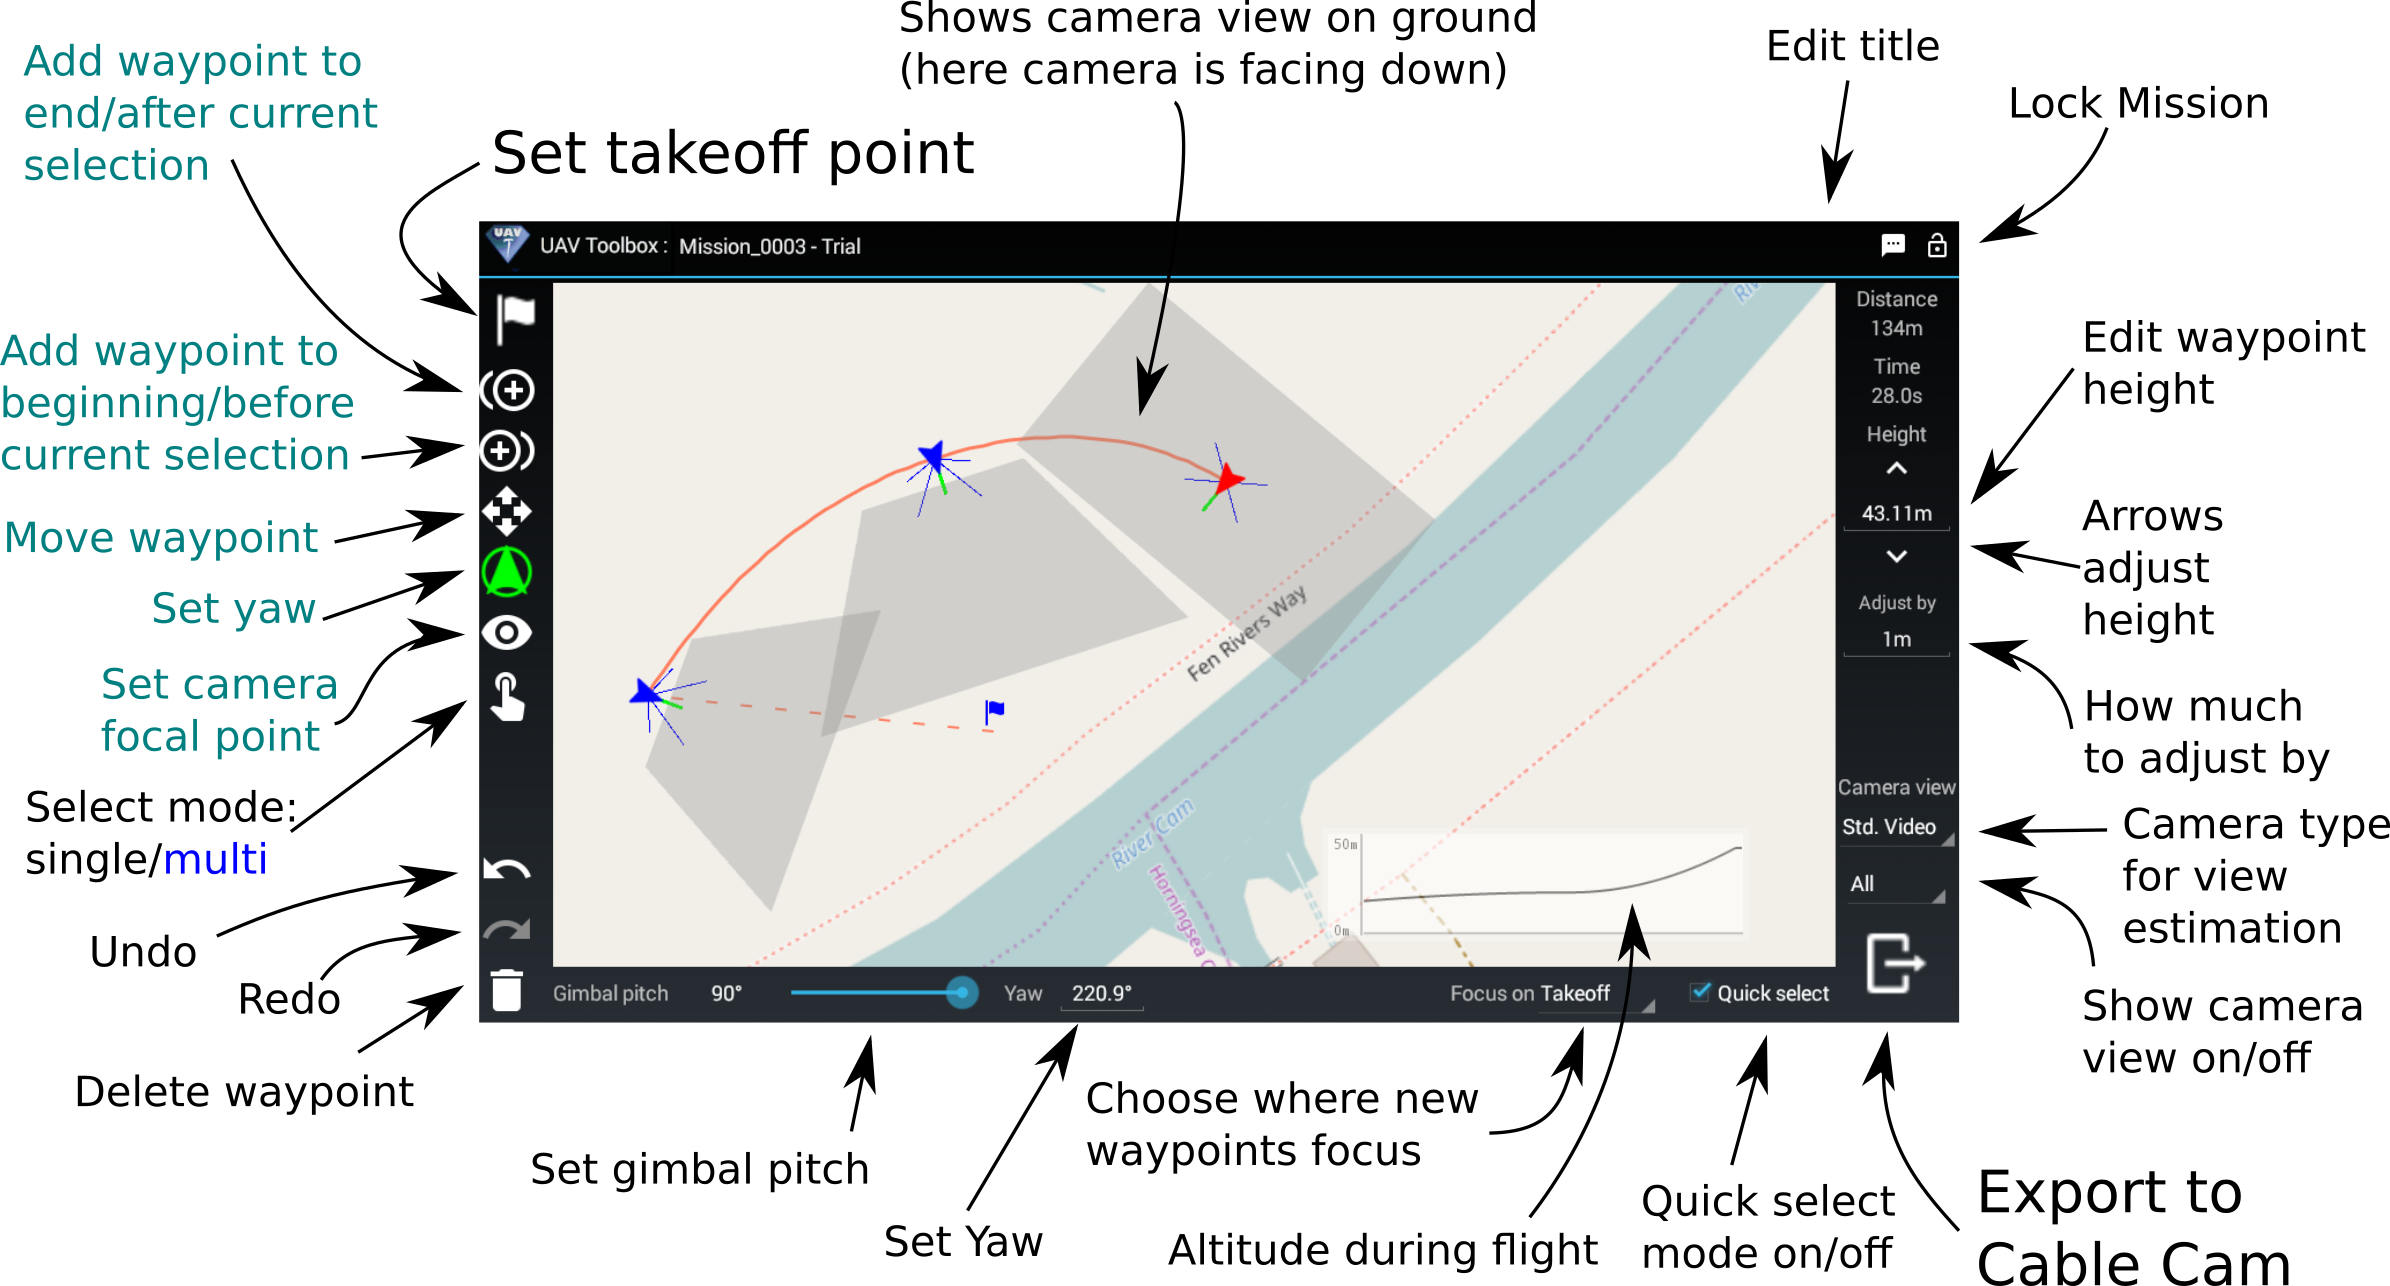 (Please note, this guide uses the term 'focal point' to mean the point that the camera is centered on rather than focus adjustment)
Basic Editing
Tap on one of the Mode Icons on the left to chose an edit mode. When you first create a mission, you must select a takeoff point, so takeoff mode is selected - just tap on the map where you plan to fly from. The Typhoon will reset it's altitude to zero at takeoff and all waypoint altitudes are relative to that point. You can move the takeoff point at any time, and so long as you take off from somewhere at roughly the same height, the Typhoon will fly the same path. After choosing a takeoff point, you are in 'Add Waypoint' mode. Tapping on the map will add the next waypoint and select it. Keep tapping to add more waypoints. To move a waypoint, tap the 'Move' mode icon. When you tap on the map, the selected waypoint will move to that location. To set the Typhoon's yaw, select 'Yaw' mode. The selected waypoint(s) will turn to face the location you tap on the map - this is the direction the Typhoon will face at that waypoint. To set the camera's focal point (the point that it looks at), select 'Focus' mode. Now when you tap on the map, the selected waypoint(s) will turn the to face the chosen location and the camera pitch will also be set (so the camera will look 'down' to view points near to the Typhoon, and 'up' if they are further away). All changes you make to a mission are remembered (even if you quit the App). Tap Undo or Redo to undo and redo them. When one or more waypoints are selected, tapping Delete will delete them.Selecting and Adjusting
By default, the Mission editor has 'Quick Select' enabled (the checkbox at the bottom right of the screen). If Quick Select is enabled you can select a waypoint regardless of which mode you're in just by tapping it on the map. Normally you are in 'single selection' mode, where only one waypoint will be selected at a time. Tapping on the select mode icon will change to 'multi selection' mode. Now you can select many waypoints - just tap on each waypoint to select or deselect it. In 'multi selection' mode, when you add a waypoint, it will be added to the selected set of waypoints. This makes it easy to adjust a set of waypoints together. If you find yourself selecting waypoints unintentionally (for instance when placing them close together), or moving/adding waypoints when you want to select, then disabling Quick Select will help. With the box by 'Quick Select' unchecked, waypoints are only selected by first tapping the select mode icon to go into select mode. Tap the icon a second time to go into multi selection mode. When a waypoint is selected, you can see the yaw and gimbal pitch at the bottom of the screen, and the height to the right of the screen. You can adjust the gimbal pitch with the slider, and the yaw and height by tapping the number to edit them. You can also 'bump' the height up and down by tapping the arrows above and below the height display. If multiple waypoints are selected, changing the gimbal pitch will change the pitch to the same value for all selected waypoints. Similarly, editing the yaw or height will set them all to the same height. If you select multiple waypoints with different heights, the height value will be shown in cyan. You can use the 'bump' arrows to adjust all of the points up or down relative to each other.Camera Estimation and Focal Points
The mission editor knows about the lens and camera modes for the Typhoon H. It uses that information to estimate the field of view for video and photographs. You can turn view estimation on and off using the dropdown in the bottom right of the screen. The editor also uses the camera information to set the focal point for new waypoints. You can select which focal point is used with the drop down on the bottom of the screen. The default is 'Takeoff' - each new waypoint will focus the camera back to the takeoff point. 'Direction' will set each new waypoint to face in the direction of flight from the last waypoint. 'Viewpoint' will focus on the most recent focal point set by the user (in 'Focus' mode), or the takeoff point if none has been set. 'Match last' will set the new waypoint to face in the same compass direction as the last. By default, view estimation is shown for all waypoints. You can choose to show it only for selected waypoints or not at all. When looking downwards, view estimation shows the area of ground covered by the camera with a gray 'rectangle'. Note that this assumes level ground and should only be used as a guide. When looking further away, the ground display is disabled, but approximate view lines are shown in blue radiating from the waypoint. The green line shows the direction the camera faces, or 'up'. You can change the camera lens/mode with the drop down on the right. The Typhoon video mode produces a 16:9 display, whereas photo mode uses a slightly wider 4:3 display.Flight Path
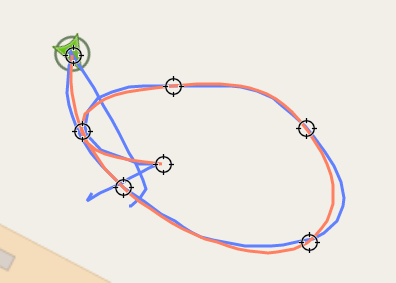
Estimated flight path (in red) compared to flown path (in blue).
Mission Options
You can edit the title of the mission by tapping the icon on the top right of the screen. If you want to avoid accidentally changing a mission, you can tap the lock icon on the top right. This will disable any editing modes and prevent any further changes being made to the mission. Tap the lock icon again to unlock the mission for further editing.Export to Cable Cam
To export a mission to cable cam, just tap the icon in the bottom right of the screen. Type in a name (at least 3 characters) then tap 'OK' to generate a Curved Cable Cam route that will be available in the Yuneec Flight Mode App. Fly safe!Flight Modes
During a flight, the Typhoon moves through a sequence of modes such as 'Ready', 'Starting Motors' and 'Return to Home', stored as a number in the telemetry file (f_mode column). The telemetry view shows the flight mode that the Typhoon is in as a small flag and the mode number. The following are the common modes for the Typhoon H:
Normal Flight
| Ready | Ready to fly (motors stopped) | |
| Starting | Motors starting | |
| Angle | Angle mode | |
| Angle (GPS Off) | Angle mode - GPS Turned off by pilot | |
| Angle (No GPS) | Angle mode - GPS Lost | |
| Smart | Smart mode | |
| Smart (No GPS) | Smart mode - GPS Lost | |
| Follow | Follow mode | |
| Follow (No GPS) | Follow mode - GPS Lost | |
| Watch Me | Watch me mode | |
| Watch Me (No GPS) | Watch me mode - GPS Lost | |
| CCC | Task mode: Curved cable cam | |
| Journey | Task mode: Journey | |
| POI | Task mode: Point of interest | |
| Orbit | Task mode: Orbit |
Emergency
| Emergency | Emergency: Motors killed | |
| RTH | Return to home engaged | |
| Landing | Return to home: landing |
Calibration
| Acclerometer | Accelerometer calibration | |
| Compass | Compass calibration |
Password Reset
You can reset your password by filling in this form: Password Reset
Note we encrypt your password so we cannot retrieve it for you. If you forget it, you must request a reset.